Managing Widgets
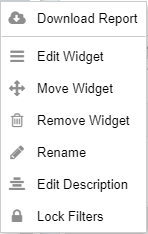
At the top right of a widget, the Widget Settings icon provides access to a range of configuration and editing options.

To swap one widget with another, from the Widget Settings menu, select Move Widget. On selecting,
- the original widget becomes outlined in orange
- the destination widget becomes outlined in green
To perform the swap, click on a green destination widget. To cancel the swap, click 
To empty a widget container of its widget, from the Widget Settings menu, select Remove Widget. A confirmation dialogue will appear.
- Click Yes to empty the widget container
- Click No to cancel the removal
- From the Widget Settings menu, select Rename. The widget's name becomes editable.
- Type a new name.
- To commit the name change, press Enter, or click anywhere outside the edit box. The new name will then be displayed at the top of the widget.
A widget's description is displayed in a smaller font below the widget's header. By default, it is blank.
To add, remove or edit a brief description of the widget's contents or purpose, from the Widget Settings menu, select Edit Description. The widget's description becomes editable.
To add or edit, type a description.
To remove, delete all text.
To commit the change, press Enter, or click anywhere outside the edit box. The description will then either be displayed under the widget’s name, or removed.
Dashboard filters affect all widgets on a dashboard except those that have locked filters.
To prevent a widget from being affected by dashboard-level filters (see Applying Data Filters), from the Widget Settings menu, select Lock Filters. A 'locked' icon  will appear in the widget's header bar, and dashboard filters will not affect the widget. Widget filters can still be edited.
To unlock, from the Widget Settings menu, select Unlock Filters.
Only present in the menu for static reports. See Static Reports.
Other actions are possible outside of the Widget Settings menu:
Real-time widgets will update to reflect the latest data at the Default Refresh Rate set in User Options. If you don't want to wait until the next auto-refresh, a widget's data can be refreshed manually by clicking  Reload.
Static report widgets do not auto-refresh, so to display the latest data, refresh manually by clicking  Reload.
To duplicate a widget:
- Add a row to the dashboard. See Changing a Dashboard Layout
- Click on an empty widget's large + button
- Select More Actions > Duplicate Existing. The dashboard will then show:
- the destination widget highlighted with an orange border
- any source widgets available for duplication with a green border
- To select a widget to duplicate, click on a green-bordered widget
The source widget is duplicated in its entirety in the destination widget.
A widget can be maximized to fill the Softdial Reporter™ 5 window by clicking  Maximize. This overlays the widget in front of the entire Reporter window, and can then be closed to return to 'normal' viewing.
Some widgets display additional information in the context menu when you hover over a particular element. Details are as follows:
| Widget Type | Mouse-over element | Information displayed |
|---|---|---|
| Table | Column header | Long title + header description |
| Detail |
Column header | Header description |
| Table/ detail report | Data cell | Value |
| Bar/ column chart | Bar/ column | KPI + value |
| Line/ area chart | Data point | KPI + value |
| Pie chart | Pie slice | KPI + value |
For widget types which support legends (i.e. bar, column,
For example, in Fig. 4, the endpoint 2002 is shown in the picture on the left, and hidden on the right. Note that the pie chart has re-drawn itself to display 4 items instead of 5.


